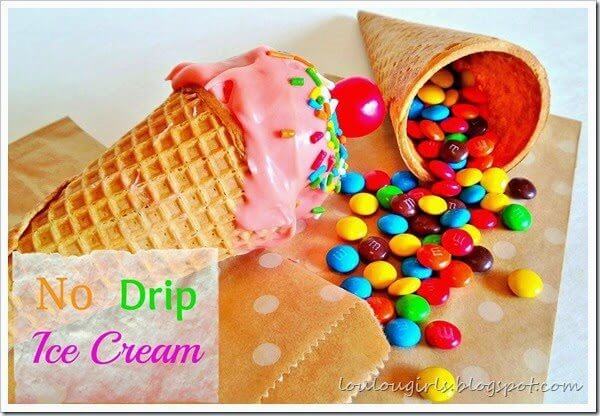
🍦✨ NO DRIP ICE CREAM CONES
Candy‑filled, donut‑topped, chocolate‑dipped, sprinkle‑covered magic — the treat that looks like ice cream but behaves like a dream.
Cute, colorful, mess‑free, and secretly filled with candy — these No‑Drip Ice Cream Cones are the easiest way to make any day feel like a celebration

GRAB YOUR SPRINKLES, YOUR CUTEST APRON, AND YOUR INNER “I CAN TURN ANY KITCHEN MOMENT INTO A FULL‑BLOWN PARTY” ENERGY — because today’s recipe is so adorable, so clever, so melt‑your‑heart fun that your family may actually start calling you The Dessert Magician of Utah County.
We’re making NO‑DRIP ICE CREAM CONES — the whimsical, candy‑stuffed, chocolate‑dipped, sprinkle‑covered treats that look like ice cream cones but don’t melt, don’t drip, and don’t leave your kids sticky from forehead to toes. They’re cute. They’re colorful. They’re chaos‑proof. And they’re the kind of treat that makes people gasp, “WAIT… what is that?!”
Let’s talk treats that actually make your life easier. Not the ones that melt faster than your patience. Not the ones that leave your kids looking like they bathed in chocolate syrup. Not the ones that require a culinary degree, a blowtorch, and a prayer.
I’m talking about fun treats — the kind that make your kitchen feel like a party, the kind that make your kids squeal, the kind that make you look like the mom who has it all together even if you’re still wearing yesterday’s leggings.
These No‑Drip Ice Cream Cones are:
- adorable
- colorful
- party‑perfect
- kid‑approved
- adult‑approved
- melt‑proof
- budget‑friendly
- ridiculously easy
- and honestly? A little bit magical
They’re the kind of treat that makes people ask, “HOW did you make these?” The kind that makes your kitchen feel warm and welcoming. The kind that makes you feel like a creative queen — even if you’re using a cardboard box as a cone‑holder (which you absolutely should).
Perfect for: • birthday parties • BBQs • school events • holidays • sleepovers • “I need something cute and fast” moments
💬 Reader prompt: Are you team “extra sprinkles” or team “extra candy inside”?
Andie’s drama class just finished the end of the year with their final play and celebrated with a cast party! Of course, my sweet daughter wanted something special.
I have made these little darlings several times through the years but I usually make them with cake pops, and I wanted to try something new! This is so simple but messy! It’s definitely worth the mess.
Andie text me from school to tell me “thank you and that everyone loved them”, which is a big deal coming from a 15 year old!
No Drip Ice Cream Cones
Ingredients:
24 donut holes
24 sugar cones
1 to 2 bags of mini M&M’s
Wilton Candy Melts
24 sour cherry candies
sprinkles
No Drip Ice Cream Cones
🍽 Directions
Step 1: Prep Your Candy Station
- Pour M&M’s, sprinkles, and sour cherry candies into separate bowls.
- This is your “treat assembly line.” Own it.
Step 2: Create a Cone Stand
- Grab a cardboard box.
- Cut holes in the top so your cones can stand upright.
- Congratulations — you’re now an engineer.
Step 3: Fill the Cones
- Add M&M’s to each cone.
- Gently press a donut hole on top to “seal” the cone.
- Try not to eat all the donut holes before you finish.
Step 4: Freeze the Cones
- Place cones on a cookie sheet.
- Freeze for 30 minutes.
- This helps the chocolate set faster and makes dipping easier.
Step 5: Melt the Candy Coating
- Place Candy Melts in a microwave‑safe bowl.
- Heat for 1 minute, stir, repeat until smooth.
- Don’t overheat — burnt candy melts are a tragedy.
Step 6: Dip the Cones
- Remove cones from freezer.
- Dip the donut‑hole “ice cream” into the melted candy.
- Twirl until coated.
- Imperfect drips = adorable. Embrace them.
Step 7: Decorate
- Add sprinkles immediately.
- Top with a sour cherry candy.
- Freeze again for a few minutes if you want the chocolate to set quickly.
💬 Reader prompt: What color Candy Melts should we try next — pink, blue, or rainbow swirl?
🔢 Calorie Count (Per Cone, Approx. 24 Cones)
- Calories: ~210
- Protein: 2g
- Carbs: 32g
- Fat: 8g
- Sugar: 24g
🍦 Nutritional Facts & Fun
- Donut holes: Soft, sweet “ice cream” illusion
- Sugar cones: Crunch + structure
- M&M’s: Surprise candy center
- Candy melts: Color + fun
- Sprinkles: Happiness
💬 Reader prompt: Should we try a chocolate‑dipped version next?
👩🍳 Cooking Tips
- Want cleaner dips? Freeze longer.
- Want brighter colors? Use gel food coloring in white melts.
- Want extra crunch? Add crushed cookies inside the cone.
- Want less mess? Keep cones upright in the box while decorating.
- Want perfect drips? Let the chocolate sit for 10 seconds before adding sprinkles.
🔄 Recipe Variations
🍫 Chocolate Lovers Cones
Use chocolate donut holes + chocolate melts.
🌈 Rainbow Party Cones
Use rainbow sprinkles + multicolor melts.
🍓 Strawberry Shortcake Cones
Use strawberry donut holes + pink melts.
🥥 Coconut Crunch Cones
Dip in white chocolate + shredded coconut.
🍪 Cookies & Cream Cones
Add crushed Oreos inside the cone.
💬 Reader prompt: Which version should we feature next week?
🧒 Kid Tips
- Let kids add sprinkles — supervised chaos is still chaos, but cute.
- Use mini cones for tiny hands.
- Let them choose their own candy fillings.
- Make a “decorate your own cone” station for parties.
🛒 Grocery Hacks
- Candy melts: Buy in bulk — cheaper and more colors.
- Donut holes: Grocery store bakery = best value.
- Sprinkles: Dollar store has surprisingly cute options.
- M&M’s: Generic mini candies work just as well.
- Sugar cones: Store brands taste identical.
💬 Reader prompt: Are you a “bulk candy queen” or a “grab it on the way” shopper?
🎯 Reader Challenge
This week’s challenge: Make these No‑Drip Ice Cream Cones, snap a pic, and share it with #LouLouGirlsConeMagic. Bonus points if your sprinkle‑pour shot is dramatic enough to deserve its own slow‑motion reel.
🍭 Leftover Remix
- Cone Sundae Cups: Break cones into bowls, add ice cream.
- Candy Cone Trail Mix: Crush leftover cones + M&M’s + pretzels.
- Chocolate‑Dipped Donut Pops: Dip leftover donut holes in melts.
- Party Mix‑Ins: Add chopped cones to popcorn.
- Birthday Breakfast: Serve donut‑topped cones with fruit.
💬 Reader prompt: Which remix should we test next?
💭 Final Thoughts
These No‑Drip Ice Cream Cones are everything you want in a treat: adorable, fun, colorful, nostalgic, and ridiculously easy. They’re the kind of recipe that brings people together, sparks conversation, and makes everyone feel like they’re part of the fun.
They’re simple enough for a weeknight, impressive enough for a party, and joyful enough for those “I need something cute immediately” days.
There’s something magical about a treat that looks like ice cream but doesn’t melt, drip, or cause a sticky disaster. Something about donut holes, candy melts, sprinkles, and sugar cones coming together that feels whimsical, nostalgic, and just a little bit mischievous.
These No‑Drip Ice Cream Cones are the kind of recipe that becomes a tradition — the treat your kids request for birthdays, the one you bring to school parties, the one you whip up when you want your home to feel festive and fun.
It’s the kind of dessert moment that makes people linger, laugh, and grab “just one more.” The kind that makes your kitchen feel warm and welcoming. The kind that makes you feel like you’ve mastered the art of joyful, effortless creativity — even if you still set timers for everything.
So here’s your mission: Make these cones. Share them with your people. Tell me your twist. Did you add chocolate chips inside Did you use rainbow melts Did you sneak a donut hole before dipping (I support all of it.)
Until then, may your sprinkles be plentiful, your chocolate be smooth, your cones stay crunchy, and your kitchen overflow with laughter, love, and second helpings.
No‑Drip Ice Cream Cones aren’t just treats — they’re a lifestyle. 🍦✨
 Your Closest CHEERLEADERS!
 We are your big sisters , cheerleaders , and confidence boosters in building a happy home. We are the Lou Lou Girls!


What a totally cute idea. I love this! Candy melts come in so many different colors you can totally customize these. Thank you for linking up at Party in Your PJs.
Hi Kimberly….I totally forgot to let you know that your No Drip Ice Cream Cones were one of my features at Party in Your PJs Link Party this week (link party host fail), you can see it here http://www.thecookiepuzzle.com/2014/05/party-in-your-pjs-5.html
Thank you for linking up and I hope to see you at the party again.
Thank you for sharing at our Simple Supper Tuesday Linky Party! You have been featured at Moore or Less Cooking Food Blog!! Nettie
Visiting from the Make it Pretty Monday link up. Love your post! What a cute idea:D
I love this idea! How fun! It's being featured at this week's link party! http://www.thelifeofjenniferdawn.com/2014/06/a-little-bird-told-me-link-party-94.html
This is such a cute idea! Thanks so much for linking up to our first "Enchanting Inspiration" link up party! We hope to see you next Wed. with more of your amazing-ness! 😉
What a FANTASTIC idea!! I'm pinning this!
Thanks for stopping by again and linking up with my weekend blog party! Good to have you :))
This rocks Ladies!!! Congrats! Your fantastic cones are being featured this week on Munching Mondays! Can't wait to see you and please spread the great news 🙂 xo Nic
Cute!!! I love this.
So cute and different. These would be adorable for a birthday party.
What a fun idea, my granddaughter would absolutely love these! Thank you for sharing your post on the HomeAcre Hop, please come back again tomorrow! – Nancy
The HomeAcre Hop
This is such a new and fun idea, Kimberly! Love it!! Thank you bunches for linking up and partying with us! Pinning this!
How coolio!! Awesome idea 😉 Pinning it!
Thanks for sharing!
Oh my! What a fantastic idea!
Thank you for stopping by the Thoughtful Spot Weekly Blog Hop this week. We hope to see you drop by our neck of the woods next week!
looks so pretty too!
These are so cute!!
Yum! What a great idea! Thanks for stopping by Love in the Kitchen and sharing. Look forward to seeing what you bring next week!
This is such a cute idea! I can't wait to make these for my grandkids. Thanks for sharing with Creative Spark Link Party. Hope you join us again tomorrow.
Glenna @ My Paper Craze
What a cute idea! I love the "surprise" on the inside. This is certainly a kid-pleaser!
Thanks for sharing at Wake Up Wednesday!
These are adorbs! I may have to make these for work sometime. They're too cute! Thank you for linking up with #WakeUpWednesdayLinky Stop by this Wednesday to see if you've been featured.
You are a genius! I love these! I'm pinning. How cute are they.
These are so cool! Thanks so much for sharing at Totally Terrific Tuesday! I hope you stop by to link up with us again this week. Remember the party starts tonight at 10pm!
Christie ~ Sparkles of Sunshine
Genius! These are too cute too. I'm pinning!