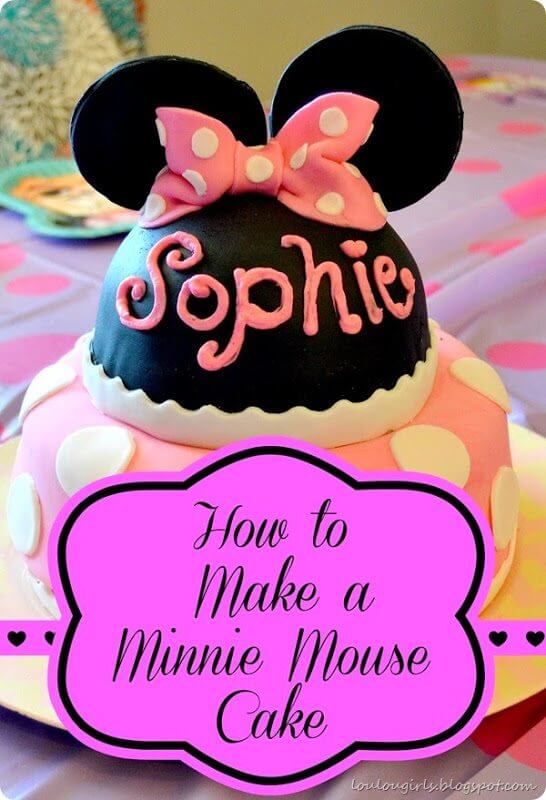
How to Make a Minnie Mouse Birthday Cake
How to Make a Minnie Mouse Birthday Cake! Let me just say that I am THE messiest cake maker around. There are mounds of powdered sugar and corn starch everywhere.
I also like to surprise my kids, so I do it the night before their birthday after they’ve gone to sleep. These pictures represent both of these truths, I’m trusting you though, this is a friend zone, right? Don’t judge me too harshly!
")
My sweet Sophie Julieann turned three earlier this month!

How to Make a Minnie Mouse Birthday Cake
She is the sweetest little mischievous stinker around, like most 3-year-olds. And, before I had a chance to take a good picture of the cake outside, with good lighting, She ate the ears and the bows off!
I was in the shower for only a few minutes, and the cake had already been devoured. Oh well, it was for her anyway! Even though the cake was destroyed, I didn’t want to pass up the chance to show you how to make this super easy cake!
It only took a couple of hours, and that’s including baking the cake and making our fondant from scratch. In the past, we’ve done tutorials on how to keep your cakes from sticking, and how to basic frost a cake.
I would recommend looking at those before getting started, especially if you’ve never made a cake before, or you feel you’re still a beginner. Here they are… Click here —>cake baking tips and here—> fondant recipe. And here—-> for basic cake frosting tips. Okay, now you’re caught up. Your cake is baked, fondant made, and your cake is frosted. Now you can color your fondant. I use Wilton food coloring gel.
They can be found at Walmart. DON’T use liquid food coloring! It will mess up your fondant. I repeat! You must use the gel for fondant! After you’ve colored your fondant, by kneading a small amount of gel into it, you can start by rolling your fondant out into a sheet.
Make sure you cover your smooth surface with corn starch. This prevents it from sticking, and is also the reason why cake decorating is such a messy task! Make sure your sheet of fondant is big enough for your cake by measuring the top of the cake and the sides.
So, if your cake is 8” across, and the height is 4”, your fondant needs to be at least a 16” cirlce, so it will cover the top and ALL of the sides completely. Walmart sells a fondant mat if you’re nervous about this part. I’ve learned to eyeball it, so I don’t use mine anymore.
Once you’ve rolled your fondant to the size needed, pick it up and gently lay it on your FROSTED cake. Use your hands to gently pull and shape it onto the cake.
I like using this tool to help me smooth it without accidentally digging my fingernails in. After your fondant is smooth, use a cookie cutter to trim the excess fondant.


How to Make a Minnie Mouse Birthday Cake
Next, roll out your white fondant. Use a round cookie cutter, or pill bottle to cut out polka dots. Use a food-grade paintbrush to wet the back of each circle with a little bit of water. This will glue it to your cake.
")
")
I like to use Rice Krispy Treats a lot when I’m decorating cakes. I just made a batch, according to the package directions, and pressed it into a lightly greased cereal bowl. After it’s cooled, I just easily flip it out.
")
")
")
Then I lightly frost it and cover it with black fondant. Don’t worry about the corn starch getting onto the fondant. You can gently rub it off with your fingers, or a slightly damp paper towel.
")
Next, have your assistant, my hubby, roll out a strip of fondant that is long enough to wrap all the way around your cake.
At this point, you could use a ruler and a cookie cutter to cut a straight line, like a ribbon, for the base of the cake, or you could buy a fancy tool like this.
")
")
Wet the back of your fondant ribbon with a little water and gently press it onto the base of the cake.
")
I like to lay mine right next to the base before pressing it up, just to make sure it’s touching the bottom. Once you stick it on, it’s hard to fix.
")
Now you can add your round top. Make sure the base of your cake has enough support. I push six or seven straws into the base of the cake and trim off the top.
That way the top of the cake won’t settle into the base overnight. You can also use wooden dowels, but that’s just more work, in my opinion, because you have to have power tools to get them to the right length.
")
Next, cut out your Minnie Mouse ears. I used the top of my cornstarch bottle for this. Make sure these have time to dry, gum paste would dry more quickly if you’re in a pinch. You can buy that at Walmart too.
I am always too lazy though, so I always just use my fondant. These need to be rock hard, so I let mine dry overnight on a cooling rack, so the air could get to both sides.
")
Next, you need to make your bow. I just use a rectangular piece of fondant, wet the edges, and pinch them together.
Usually, I would tell you to let it dry overnight too, but I put mine right on Minnie’s head so they could dry in the shape of the head.
")
")
")
The middle will just be pinched together, then you can add another strip of fondant to cover up the ugly middle.
Like the picture below, remember to lightly wet the fondant, so it will stick.
")
Next, color the remaining frosting pink and write the name of the birthday girl or boy on the cake, using a piping bag. Add small white polka dots to the bow, making sure to cover any imperfections.
And finally, once the ears have hardened. Use a butter knife to etch out space on the back of the cake behind the bow. I didn’t have my hubby there to take a picture while I was doing it, so you’ll have to use your imagination.
Then, gently press the ears into the slit. I let mine rest against the bow because it was completely hardened.
")
How to Make a Minnie Mouse Birthday Cake
There you have it! Please feel free to ask questions in the comments! If you need more inspiration for cake decorating, look at these other cakes we’ve made!


 Your Closest CHEERLEADERS!
 We are your big sisters , cheerleaders , and confidence boosters in building a happy home. We are the Lou Lou Girls!


Those cakes are all pretty impressive! Nice work!
Thanks Sarah!
Love that little stinker! The cake is awesome too! 🙂
Thanks Brooke:) she met Minnie yesterday, it was so fun!
Your cakes are truly a work of art! It's wonderful that you keep it a surprise. Beautiful!!
Oh thank you Pam!
What a fantastic cake!! It simply looks AMAZING !!
Thanks Winnie!
Love it! I love that I can see your cornstarch covered bench too – in fact I am a little depressed that its only cornstarch and not legos, spoons, empty raisin boxes etc like mine is! te he he She is a cute little stinker tho and the cake is amazing. Stopping by from Tuesdays Table. 🙂 Anna – Just a Mum
Well, don't be depressed, that's how the front room looks right at this very moment! Busy mom's have to put up with little messes every now and then, right?!
Thank you for sharing your decorating secrets!
How many recipes of the fondant did you have to make for the Minnie Mouse cake? I’m giving it a try tomorrow!
3. Please let me know how it turn out!